Introduction
Most people think of Eloqua Insight as a tool that can give you reports on what happened with your Eloqua campaigns and other assets — which emails went out, how many people opened/clicked, how many landing page visits took place, and so on. But, sometimes it’s just as important to know what didn’t happen. If you have an ongoing campaign that you expect to run and send emails daily, you would want to know if it stopped sending emails suddenly. This kind of failure can be easy to miss — it’s always hard to see the thing that is not there.
One of our clients ran into a problem like this recently. They have an onboarding campaign that sends out a series of emails to new customers. The campaign generally sends out several hundred emails per day. One of the email managers noticed that the campaign was not sending emails — and it had not sent any emails for over 10 days! It turned out that the problem was caused by a bug that had been introduced in the integration that sent data from their customer database to Eloqua. It would have been great if a red flag had somehow been raised when the campaign stopped sending emails. To prevent this sort of problem from reoccurring, we built a campaign monitoring system in Insight to send warning emails to the marketing team when specified campaigns fail to send an email, on a particular day.
This blog post describes the tools we used to set up this monitoring system. It assumes that you have a general knowledge of how to create custom reports and agents in Eloqua Insight.
Building a Campaign Monitoring System
The campaign monitoring system that we built for our client consists of a custom report and agent for each campaign that we decided needs monitoring. Here are the steps to set up a report and associated agent to monitor a campaign.
The Report
We want to create a report that returns data if the campaign sent email in the last 24 hours but does not return data if no sends occurred. Before you start, be sure to note the full name of the campaign that you want to monitor. You’ll need that information later.
To set the report up, choose New > Analysis at upper right in Eloqua. Select Email Activity as the Subject Area. Click the disk icon at upper right to save the report. You may want to create a folder for these campaign monitoring reports if you are going to create several of them.
Drag these three fields from the Subject Area panel at left into the Selected Columns area:
- Attributes > Campaign > Campaign Name
- Attributes > Email Activity Calendar > Date/Hour
- Metrics > Total Sends
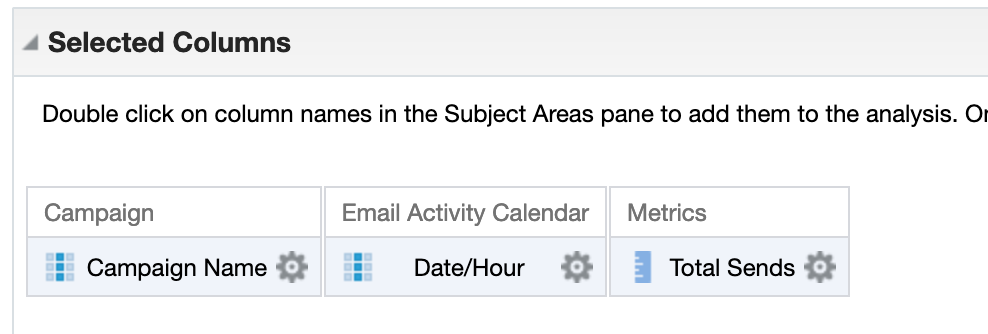
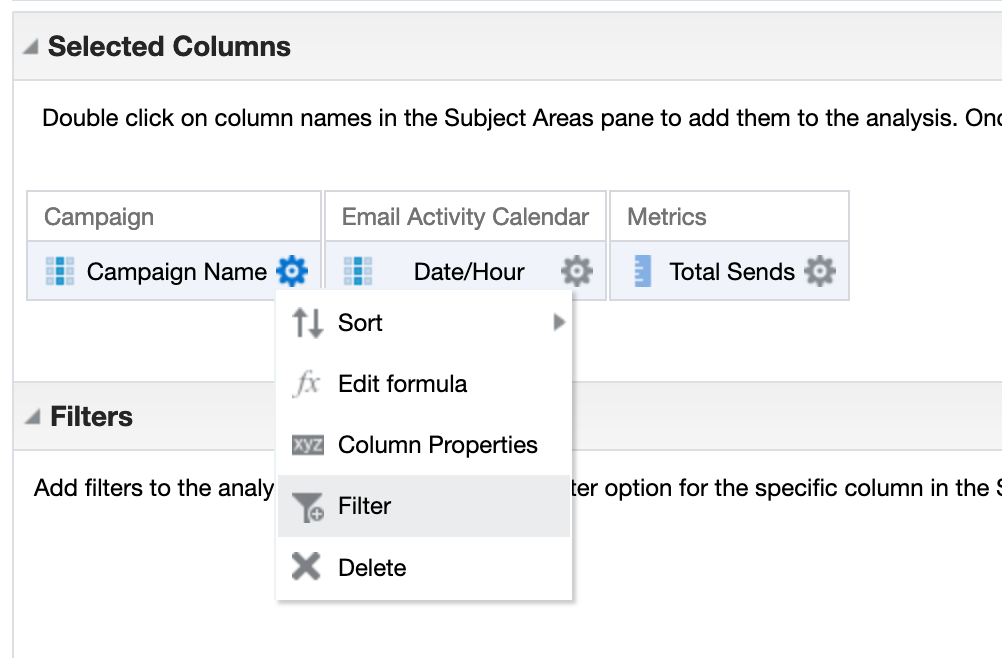
Now we’ll need to set up a couple of filters. We want to add a filter by Campaign Name and one by Date/Hour. To add the filter by Campaign Name, click on the little gear next to “Campaign Name” in the Selected Columns area, then choose Filter.
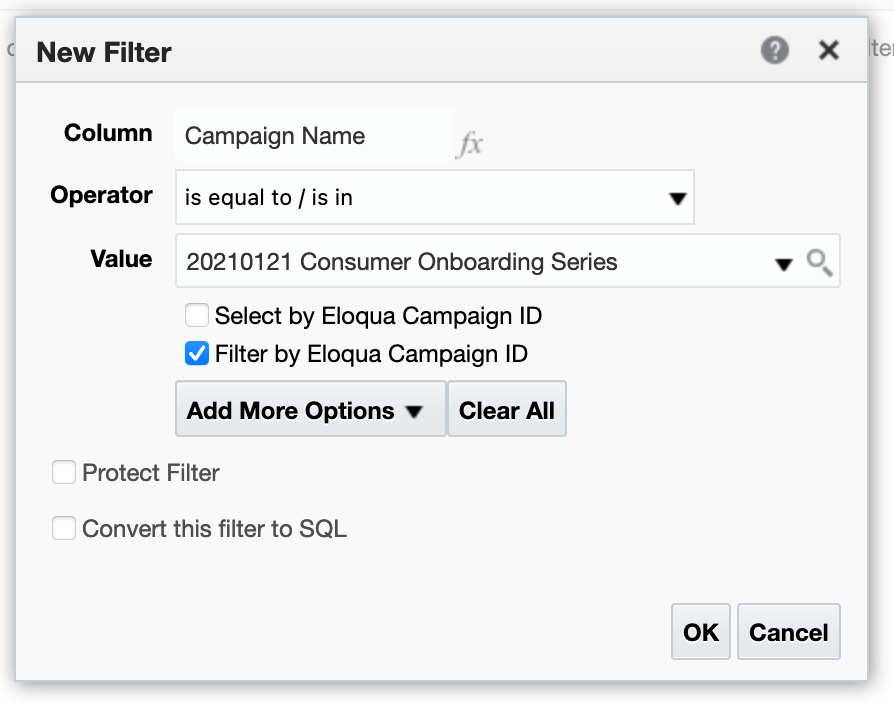
In the resulting dialog, enter the full name of the campaign you want to monitor, then click OK to save the filter:
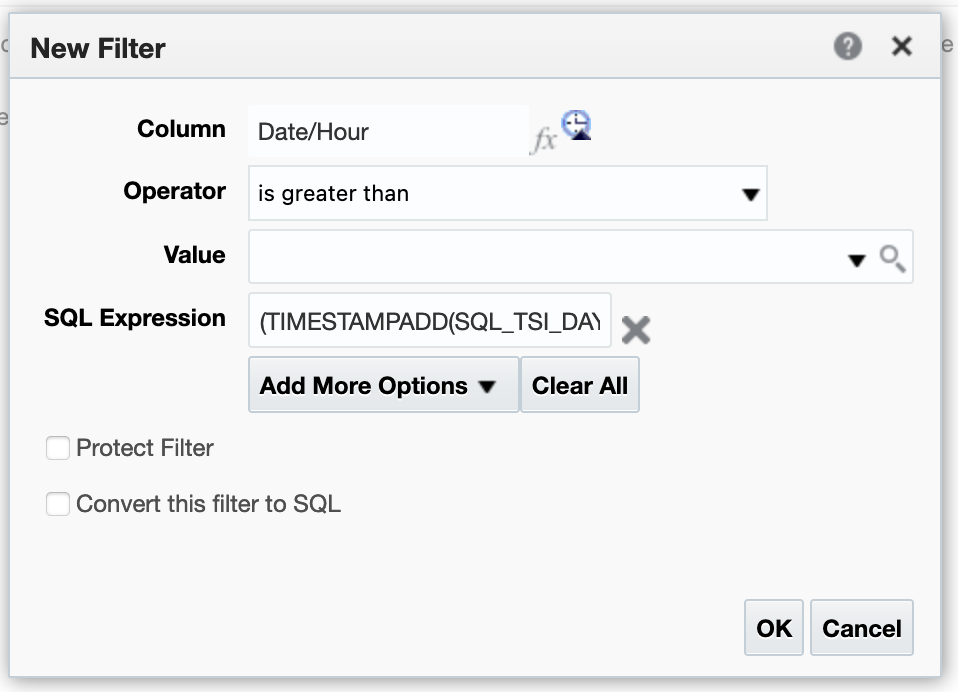
Setting up the date filter is a little trickier. Click the gear icon next to the Date/Hour field in the Selected Columns area and choose Filter. We want to set up a filter that looks for yesterday’s sends. There isn’t a direct choice for this, but you can use an SQL query to get the result we want. First, choose is greater than as the Operator. Then click Add More Options and choose SQL Expression from the resulting menu. This adds a new field called SQL Expression to the dialog. Copy the expression shown below and paste it into the SQL Expression field.
(TIMESTAMPADD(SQL_TSI_DAY,-1,CURRENT_DATE))
The resulting dialog should look something like this:
To test the report, click the Results tab at the top left. You should see a count of recent sends for your campaign, if it did in fact send sometime in the last 24 hours. Assuming all is well, go ahead and save the report. A quick way to verify the send count for the past 24 hours is to go to the campaign, click the Report icon at upper right, and then choose Campaign Email Statistics:

In the resulting report screen, set the Evaluation Period to “Last 24 Hours” and you’ll get a count for that period.
Save the report, and be sure to note the name and location of the report – you’ll need that when setting up the Agent to automate the report.
The Agent
Agents are Eloqua Insight’s tool for running reports at specified times and for setting up notification conditions. We want to set up an agent that will run our report and send a warning email if the campaign did not send any emails in the last 24 hours.
Choose New > Agent from the menu at upper right. Agents are configured through settings on a set of tabs. Here are the settings to use.
First, click the Schedule tab. To monitor a campaign that runs 7 days a week, choose Daily, Every 1 Days. Set the Start time for 12:01 AM. If your campaign runs only on certain days of the week, choose Weekly and then select the days of the week just after your campaign runs. For example, if your campaign runs Monday to Friday, choose Tuesday to Saturday.
Now click on the Condition tab. Click the radio button next to Use a condition and then click the Create button. The default is to create a condition based on an analysis, which is what we want. Choose Browse… and select the report that you just created. Then choose is equal to as the condition and leave the numeric value at zero. This sets a condition that will be true if the report we just created returns no results. You can click the Test button to verify your condition. Assuming the campaign you’re monitoring sent emails yesterday, this should evaluate as False. Click OK to save the condition.
Now click on the Delivery Content tab. Set the Subject to something like “WARNING: [Campaign Name] – No Email Sent”. For Content, click Browse and select the report you just created. Choose Excel 2007+ as the format. For the Attachment Note, enter details of the campaign and include a link to the campaign, e.g.
WARNING! The campaign “20210121 Consumer Onboarding Series” did not send emails yesterday. Please review campaign and segment immediately.
Campaign link: https://secure.p04.eloqua.com/Main.aspx#campaigns&id=9999
Here’s what the resulting dialog looks like:
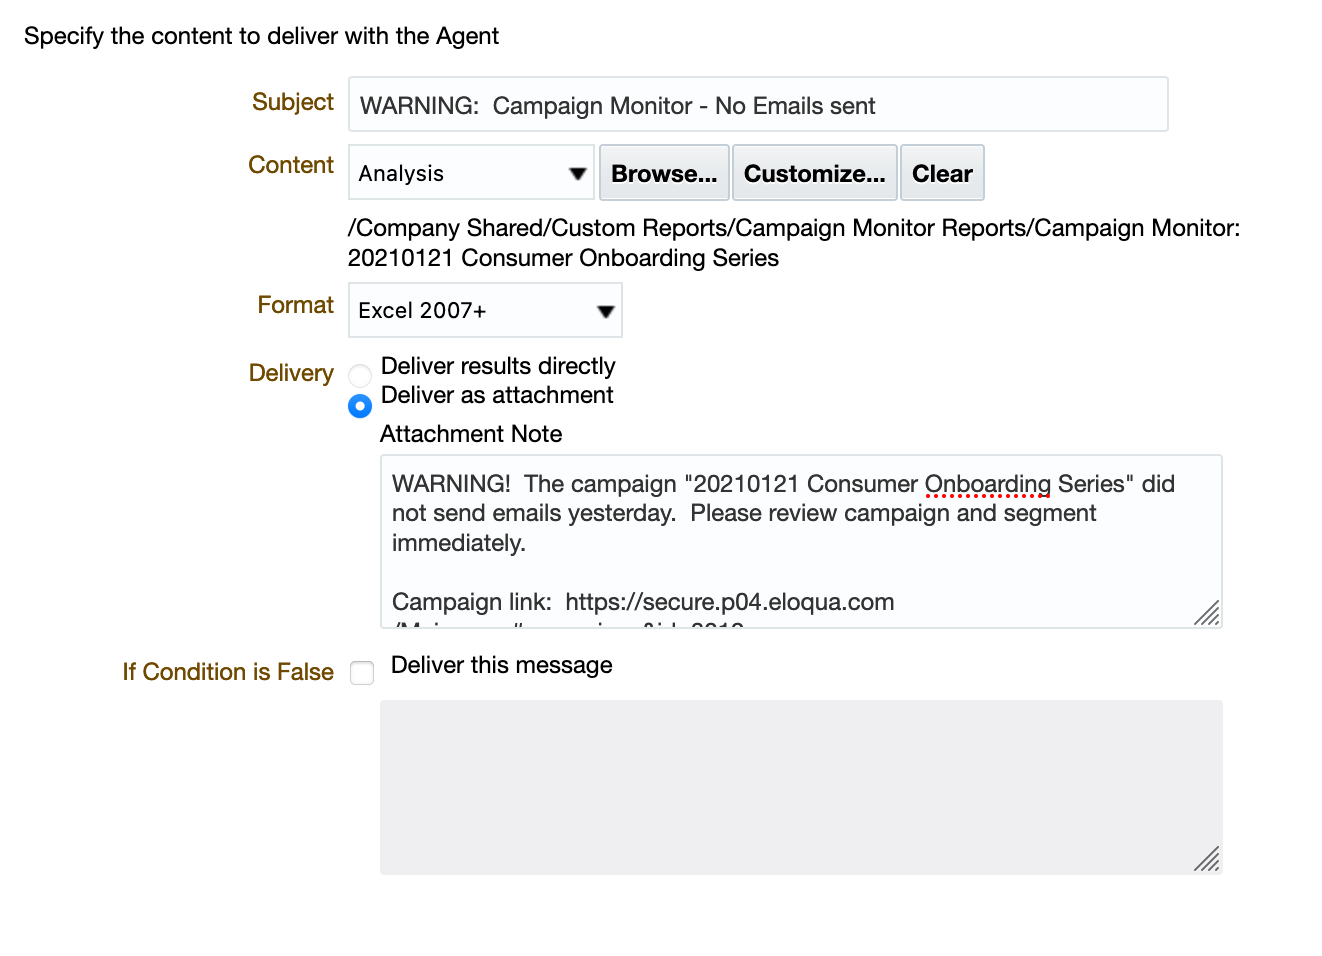
Do not check the If Condition Is False checkbox.
Click the Recipients tab, then click the Add Email icon (an envelope with a green plus sign) and enter the email addresses of the people you’d like to send the warning to.
Finally, click the Destinations tab and check Devices > Specific Devices > Email, as shown below:
Save the Agent and you’re done!
Recap
To review, we’ve created a simple report that shows sends within the last 24 hours for a specified campaign. We’ve then set up an Agent to run every day, just after midnight. It runs the report, and if the report does not return data (i.e. if no emails were sent by the campaign), the agent sends a warning email. If the report does return data, that means that the campaign was sending emails as expected, and no action is taken.
This technique can help you assure that your important ongoing campaigns are running as expected and can provide early warning if there’s a problem. Let us know if you’d like expert help setting up reports and using agents or if you had any marketing strategy related questions, feel free to reach out, we are happy to help!
About the Author
Andy is a Lead Technology Consultant at Tegrita with over twenty years of experience in marketing automation and software product management. He is an Eloqua Implementation Specialist, and focuses on using technology to find practical solutions to customer needs. Andy has a bachelor's degree from Princeton University and an MBA from UCLA's Anderson School.
