Every modern marketer knows that segmentation and targeting is key to marketing effectiveness which is why we use Oracle Eloqua. Eloqua’s segmentation capabilities extend far beyond typical marketing automation platforms down to a near granular depth. Enhanced depth and segmentation allow Eloqua to augment your marketing efforts for a more personal and relatable result with your specific audiences provided you store and format the data you capture.
Consistently having accurate, useful information at your fingertips is the bane of the marketing departments role. Fortunately, we have picklists to circumvent those challenges saving you copious amounts of time and effort. Picklists and segmentation allow you to concentrate on what matters most in your role. If you haven’t watched the video below, I suggest giving it a look as I give you specific examples of use cases where picklists are extremely valuable.
In this post, I detail how to create and configure picklists and further segments in Eloqua Segments. We work through a step-by-step process with some helpful screenshots and tips to improve your targeting abilities.
For this example, our primary market is a selected 12 states and that we need to consistently filter for contacts in the selected states.
Step 1: Create the Picklist
First find your way to Settings > Manage Picklists.
- If there is a picklist containing all of the values required, you can click the arrow and copy the picklist to start from the full list.
- If there is a picklist containing all of the values required, you can open the picklist to export the values and edit your content in MS Excel.
- If there is not a picklist that containing all of the values required, you can simply create a new picklist.
The Oracle Eloqua help section is a great resource offering the basic steps for working within a picklist. As a general proven practice, I start the name of my picklist with either the name of the existing picklist (e.g. State or Province) or the name of the field that I am creating the picklist for and then add the specific purpose.

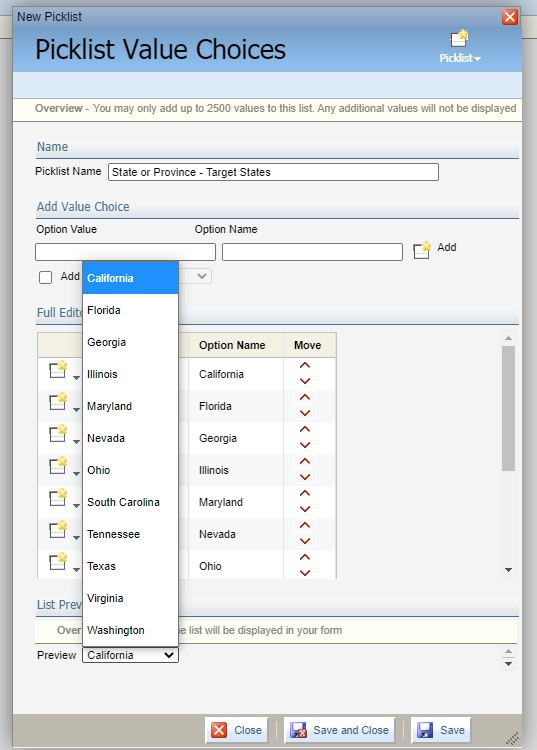
Then we can add all the values that we want to use for our segment. In the example below I have only included the 12 target states.

Step 2: Create Your Segment
Now that we have our picklist, we are ready to build our segment. You will use one of the following criteria depending on where your field is stored:
- Compare Contact Fields
- Compare Account Fields
- Has Linked Contact in Custom Object
- Has Linked Account in Custom Object
Once you have decided on your criteria, you can then select “in picklist” and choose your list. This will limit your audience to only contacts or accounts that have any of the values in the picklist.

By using this approach in Oracle Eloqua, if your target states ever change you can simply update the picklist and all segments that use that picklist will be updated. Easy-peasy! Two simple steps that save time, improve efficiency and ultimately save you money!
About the Author
Brandi Starr is a true Modern Marketing Maven; she believes marketing magic happens at the intersection of strategy, creativity, and technology. As Chief Operating Officer at Tegrita Brandi helps companies of varying sizes to attract, convert, close, and retain customers using technology. Brandi is the Co-Author of CMO to CRO, The Revenue Takeover by The Next Generation Executive and the host of the Revenue Rehab podcast.
