» Avoiding the Oops Email: Steps to Effectively QA Email Campaigns
Have you ever received an email that made you think ‘’How on earth did this ever get sent?!’’ Opening up your inbox to find a broken field merge or placeholder – “Dear {null}” or even worse, an email that reads “This template is used by integration tests only.” (I actually received that one recently… sent from a major cable network!) It’s every email marketer’s worst nightmare to send out a big blunder that permeates the inboxes of 500,000 people.
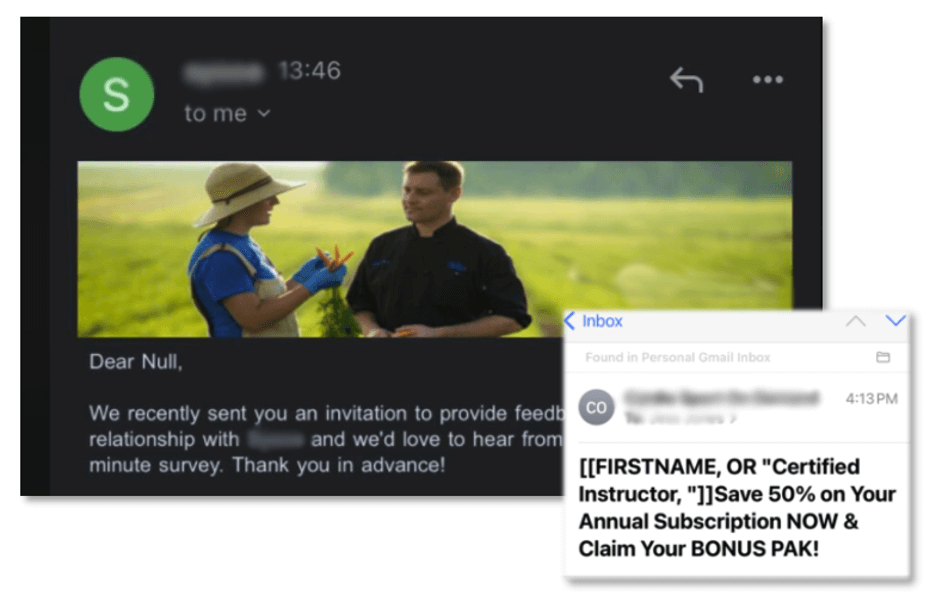
If this has happened to you or somebody on your team, acknowledge that everyone, no matter how smart and well-intentioned, makes mistakes. So what can you, as a modern marketer, do to prevent this mistake from happening?
This article describes three techniques that we use here at Tegrita to ensure that we and our clients don’t make these very mistakes. First, we use build sheets to detail the requirements for campaigns and campaign assets. Second, we use test data where appropriate to test dynamic content and campaign flow. Finally, we host short approval review meetings where we go over campaign goals and review assets as a final check before approval and activation. Let’s take a look at these components in the following sections.
Build Sheets
Whether you are building an email, campaign, or landing page, having another pair of eyes to check your work is a common method used to increase asset accuracy. But how does the person doing QA know what to check? And how does the person creating the assets know exactly what to build? Because human error is so common, a build sheet is the answer to ensure complete accuracy
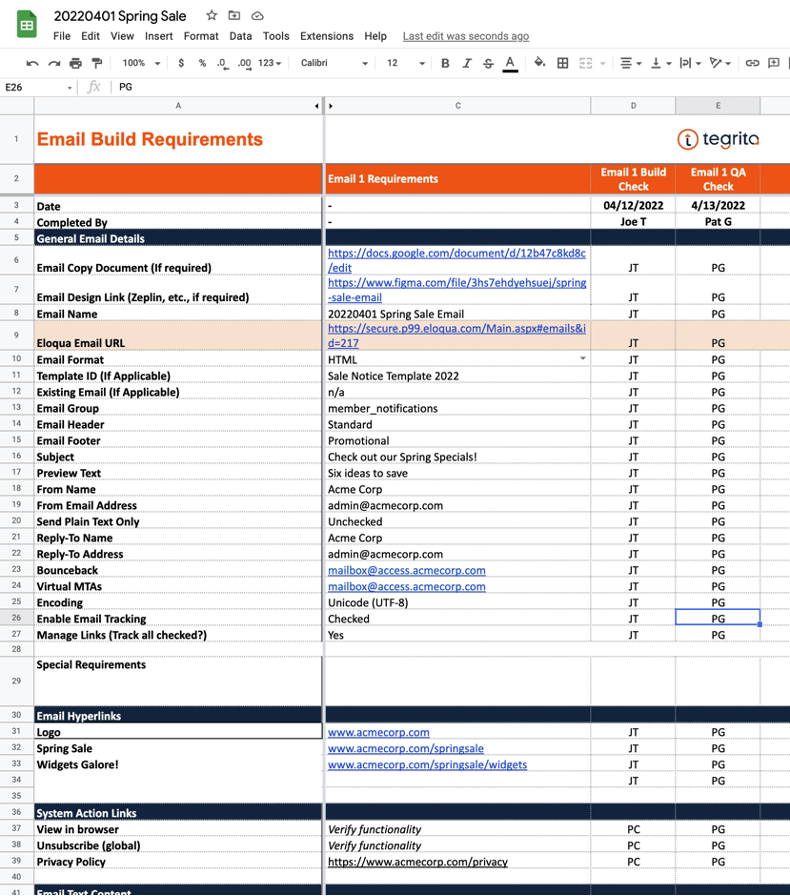
Here at Tegrita, we use build sheets to specify all the details of an email campaign. A build sheet is a spreadsheet that provides everything a knowledgeable Eloqua user would need to create and configure all the assets associated with a campaign.
What does a spreadsheet like this look like? Our build sheets typically have at least four tabs:
- Overview: This tab includes information on the overall goal of the campaign, and information about the campaign requester.
- Email: This tab describes any emails included in the campaign. General email settings are noted. If a particular email template is to be used, or a previous email is to be copied, that information is spelled out. Every link in the email is detailed, providing the destination address as well as any required URL parameters. Where appropriate, a link is provided to a design file in a tool like Figma or Sketch. A link to a copy deck showing agreed-upon text may be provided. If the email contains dynamic content, the logic is described along with content variations.
- Segment: This tab describes the audience for the campaign. If the segment uses data to define the audience, the appropriate criteria for both inclusions and exclusions are detailed. If a list is used, a link may be provided to an Excel file or CSV file in Box or another file repository. Final contact counts are recorded to ensure that they meet the expectations of the person who requested the campaign. A segment that includes 250,000 contacts when you were expecting only 2,500 is a sure sign that something is wrong!
- Campaign: All campaign settings and fields are listed. If the campaign calls for any logic or decision steps, they are described in detail.
Landing page and form tabs may also be provided for campaigns that make use of these assets.
Each tab describing an asset has at least four columns:
- The name of the setting (e.g. “Subject Line”)
- The value for the setting (e.g. “Check out these prices!”)
- A column where the build resource can note their initials, showing that they’ve built the asset according to the described setting.
- A column for the QA resource to note their initials, along with any comments on their review of the asset.
Using build sheets in this manner requires at least three steps:
- Someone familiar with project requirements creates the build sheet and fills out all the details. If the request for the campaign is unclear, the person setting up the build sheet works with the requester to clarify any ambiguities. We’ve created QA sheet templates for common campaign types and that makes this process far more seamless.
- The build resource creates the assets based on the specifications in the build sheet. As they build the asset, they add their initials to the build column to show that they’ve built the asset properly and have checked their work.
- The QA resource checks the asset against the specs in the build sheet. They add their initials to the QA column to show that they’ve checked everything against the specifications. If they find errors, they can note it in the appropriate cell.
In our process, the QA resource often fixes any small errors they find. Larger problems are noted and sent back to the build resource for correction.
This may seem like a lot of work just to build a simple email, but we have found that following the process consistently ultimately saves time… The person building the campaign knows exactly what to build, and doesn’t have to go back and forth with the requester asking questions and filling in missing details. The QA resource knows exactly what they’re supposed to check, making the test process much more efficient. Most importantly, errors are found and corrected!
Test Data
There are two ways of doing QA in Eloqua, or in any marketing automation system for that matter:
- Testing by inspection: Having a second person review the settings, content, and configuration of an asset to make sure that the assets meet all requirements.
- Data-driven testing: Using test data you’ve set up to exercise the most important options and choice points in your campaign.
The first option is important and useful — you’re adding another set of eyes to review the work of the person who built and configured the assets in the campaign. This method will identify many errors and help to achieve full reliability.
But there are times you need to go further and really verify that your campaign performs as expected when it runs into real data. One instance where this is important is when you are using dynamic content rules to drive content in an email or landing page. Complex campaign or program canvas flows, with multiple decision steps, also benefit from testing with real data. In both these cases, the most effective way to test is to use properly configured test records. In this section, I’d like to talk a bit about how to create and use test records to do this type of testing.
A test record is a contact record you’ve created specifically for use in a QA process. Ideally, it has an email address that goes to your mailbox, or to a mailbox that you can monitor. That way, when you are testing dynamic content or campaign flows that send emails, you can see the results in your mailbox or the test mailbox. You may be able to ask your email administrator to create test email accounts specifically for testing, and to give you access to the mailboxes for those test accounts.
If that is not an option for you, try the following popular trick. Gmail has a hidden feature that lets you create test emails quickly and easily. Most people don’t realize that Gmail will ignore any text starting with a “+” (plus character) in an email address. This means that a Gmail address like [email protected] will be delivered to the mailbox associated with [email protected]. If your company uses Gmail for corporate email, then you can automatically use email addresses like [email protected] as test records, and have them show up in your mailbox. If your company doesn’t use Gmail, you can still create a Gmail account and make test email addresses based on the Gmail account you create.
Once you’ve created some test email addresses to use, you can start creating test records. The general rule is to create one test record for every variation of data that could produce different results in dynamic content or in campaign or program flow. Let’s say you have a dynamic content rule configured as shown below:
| Rule | Condition | Content |
|---|---|---|
| Default rule | n/a | Come visit us in our New York office |
| Georgia | State or Province = Georgia | Come visit us in our Atlanta office |
| California | State or Province = California | Come visit us in our Santa Barbara office |
To test this dynamic content effectively, you should create three test records, as shown below:
| Email Address | State or Province |
|---|---|
| [email protected] | Texas |
| [email protected] | Georgia |
| [email protected] | California |
Create a test campaign that sends the email using the dynamic content, then create three contacts with the above email addresses and data values. Add them to a segment and use it as the feeder for the test campaign. Run the contacts through the test campaign and then check the emails that show up in your mailbox to make sure that the content selected for each test record is correct. For more complicated dynamic content rules, it’s a good idea to set up a spreadsheet with one row for each test record. For each test record, detail the following:
- Rule name
- The email address that will be used to test the rule
- Any data values that need to be set to test all important variations
- The expected outcome
- A column for results to be noted
Testing complex campaign flows is a similar process. First, you’ll need to understand the important pathways through the campaign or program canvas, and what decision steps drive contacts down different paths. If there are more than a handful of paths, list them in a spreadsheet like the one I described above. Create test records and set up their data to exercise all the different flows through the canvas. Add the test records to a test segment. You may want to make a copy of your actual campaign and do your testing on the copy. That allows you to shorten wait periods on the test canvas so that you can more easily see contacts move through the canvas.
Next, the testing takes place. Activate the test program canvas and monitor the way that contacts move through it. You may need to move contacts forward at times to get around a wait step in a reasonable time. Make sure that you track every test case in your spreadsheet and that all contacts move through the canvas as expected. If you need to make fixes in your test campaign, make sure that the changes are made in the real campaign as well.
Doing this level of testing does take time, but, as with build sheets, the investment of effort is well worth the payoff — having the confidence that your emails, landing pages, campaigns, and programs will work correctly!
Approval Review Meetings
An approval review meeting is the last quality assurance step we typically take before activating a campaign. The goal of the meeting is to review the campaign with the person or team that requested the campaign and verify that everything is set up correctly. Prior to the meeting, send test emails so that the requester can view the emails and make sure all content is as expected.
Our approval review meetings focus on four things:
- Goal: Summarize the goal in a sentence or two and make sure everyone is in agreement.
- Audience: Who gets the email? Review the segment criteria. If list driven, make sure that the list count matches what was provided. If data driven, review the criteria and make sure they are correct. Look at the final count. Does it match expectations?
- Campaign: Review timing and flow. Is the campaign a simple batch-and-blast campaign, or something more complicated? Review dates and discuss any non-standard flow.
- Emails: Test emails should have been sent and reviewed before the meeting. Verify that they have been read and approved. If last minute changes are made during the meeting, send new tests.
The goal of the meeting is to get approval from the requestor. This may come verbally during the meeting, via email (it’s always good to have a record of approval), or via a task/project management system.
Doing good quality assurance isn’t easy — it takes planning, effort, and cooperation among team members. But when executed effectively, the results are more than worthwhile by eliminating preventable errors. If you’re not doing QA consistently now, up your game by trying one of these techniques. I think you’ll be pleasantly surprised by the results!
About the Author
Andy is a Lead Technology Consultant at Tegrita with over twenty years of experience in marketing automation and software product management. He is an Eloqua Implementation Specialist, and focuses on using technology to find practical solutions to customer needs. Andy has a bachelor's degree from Princeton University and an MBA from UCLA's Anderson School.